

Expert’s Rating
Pros
- Excellent print quality
- Fast print times
- Automatic colour changing
- Built-in camera
Cons
- Basic non-touchscreen control panel
- Filament wastage can be high in multicolour printing
- No failed print detection
- Lacks “Skip Object” from X1 Carbon
Our Verdict
The Bambu P1S is an excellent 3D printer that’s well worth the relatively high price. The Combo is ideal if you need to regularly print in more than one colour, but it’s also really handy being able to print different objects in different colours without having to change filament manually. It’s just a shame Bambu didn’t put a nice touchscreen on it.
Bambu Lab is a brand that has appeared almost of nowhere and quickly established a reputation for top-notch print quality. Using a CoreXY motion system, its printers are also much faster than traditional “bed slingers” so you can have your cake and eat it: great-looking prints without the long wait times.
The P1S is one of the company’s latest models, offering many of the flagship X1 Carbon’s features at a more affordable price.
That means it’s compatible with the Bambu AMS – effectively a CD autochanger (remember those?) for 3D printing – and has the same build volume, print speeds and quality.
There are a few disadvantages, but these won’t be deal-breakers for everyone. You might end up deciding to spend even more on the X1 Carbon, but there’s still plenty to love here.
Features & design
- 256mm cubed print volume
- Fully enclosed design
- Fully automatic bed levelling
The P1S is essentially a fully enclosed version of the P1P. Being protected from temperature changes and drafts in the room is important when you’re printing with certain types of filaments such as ABS that need a consistent ambient temperature that’s higher than room temperature.
Build volume is the same 256x256x256mm, as is CoreXY movement system and control panel, with the main difference – aside from the side and top panels forming an enclosure – being a built-in camera that lets you monitor prints.
The P1S stands head and shoulders above the competition. Print quality is absolutely astounding
Given the tiny price difference between the two, the P1S is the obvious choice.
For the uninitiated, all Bambu printers come virtually ready to go and with the P1S you just need to attach the screen, spool holder and remove the packing material (and shipping screws) before beginning to print.
With the P1S Combo, setup takes about 40 minutes because you have to extract the AMS from the print chamber first. Fortunately, Bambu has a great YouTube video and step-by-step instructions that show you exactly which screws to remove and how to connect it all up.

Jim Martin / Foundry
When you switch it on for the first time, you’re prompted to connect it to Wi-Fi and link your Bambu account, which you’ll have to create, probably in the Bambu Handy mobile app.
After that, it runs an in-depth calibration that takes around 15 minutes. Once that’s done, you can start printing. As you’d hope for at this price, bed levelling is completely automatic, so the first layer should be perfect every time.
You can choose whether or not to run a much shorter calibration before each print, but this is five minutes well spent, especially for anything that takes more than an hour to print.
One of the chief differences between the P1S and Bambu’s flagship X1 Carbon is the screen. On the latter you get a nice colour touchscreen, similar to that on the Creality K1 and K1 Max, reviewed. It makes the X1 Carbon easy to use and shows you a picture of what you’re about to print.
The small dot-matrix monochrome screen on the P1S is undoubtedly its worst feature and feels out of place on what is otherwise a premium device. Even cheap bed-slingers now have touchscreens, so the fact you have to use a direction pad to navigate to menus and options on the P1S is disappointing.

Jim Martin / Foundry
There’s just about enough information and control, such as current temperatures, remaining print time and the ability to load and unload filaments. And as most people will start prints from the Bambu Studio app on their computer or via the mobile app, it’s not a complete disaster.
Strangely, the P1S’s bed is limited to 100°C, which is 10°C less than the X1 Carbon. Not that it makes much difference: you can still print ABS, ASA, PETG and other filaments without warping issues.
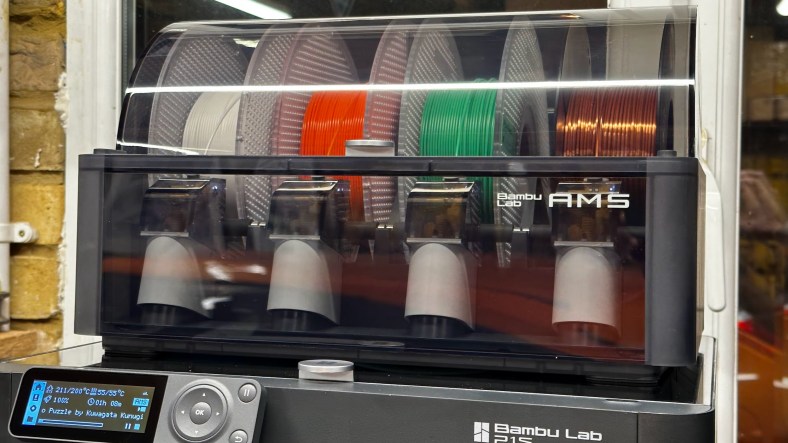
AMS – Automatic Material System
- Up to four reels of filament
- Up to four AMS units per printer
The AMS sits on top of the P1S and has space for four reels of filament.
Jim Martin / Foundry
You can still hang a fifth reel on the spool holder at the rear, but this is an either or situation: you cannot have all five reels available for printing at the same time.
The AMS is a really clever bit of kit. You simply insert the filament from each spool into the feed tube a little way and that’s it: from then on the AMS handles loading and unloading automatically.
It’s air-tight, or at least close to it, and two large packs of silica gel help to ensure no moisture can be absorbed by the filament while it’s in the AMS.

Jim Martin / Foundry
Swapping reels in and out is also easy as none are left routed through to the print head. You have to push down quite hard on the grey tab but then the filament can be pulled out and a new spool dropped in. Poking the filament into the tube is enough: the AMS takes over.
Performance
- Superb print quality with most filaments
- Fast
- Virtually no failed prints
It’s the end result that matters most, and this is where the P1S stands head and shoulders above the competition. Print quality is absolutely astounding, from the clean, even finish to the precision that allows you to print intricate working models whose parts aren’t fused together.

Jim Martin / Foundry
Bambu was good enough to send a variety of filament to try including carbon-fibre infused PLA and PETG to the much tougher-to-work-with TPU.
In fact, it was only when printing with TPU that print quality took a nosedive. It was acceptable for small things like the spiders you see above, but although this phone case printed successfully with some strategically placed supports, the small bottom chamfer was quite messy on the top edge and overall quality was simply nowhere near models printed with more rigid filaments.

Jim Martin / Foundry
I’ll let the P1S off here because TPU is hard for any printer, but I will say that it’s annoying to have to swap between using an external spool and filament in the AMS. You can’t put TPU in the AMS, and that means disconnecting its feed tube and manually feeding the TPU (or whatever you’re using externally) into the print head.
I couldn’t find a way in Bambu Studio to print from that external reel without also disconnecting the AMS’s power cable. It showed the TPU loaded correctly, but still gave me no option to print from it, throwing an error because – of course – there was no matching filament in the AMS.
Speed is the other highlight. That’s something you should expect from any CoreXY printer, but if you’re upgrading from something like a Creality Ender 3 or any other bed slinger, it seems incredible to be able to get such high quality prints in so little time.
A 3Dbenchy takes less than 20 minutes, around a quarter of the time most entry-level 3D printers take, and the default speed of 300mm per second means prints rarely take more than an hour or two.
Reliability is great, but not perfect. However, apart from one or two disappointments where things didn’t stick to the textured PEI plate, the only times prints failed was when I made a mistake such as selecting the wrong plate in Bambu studio or forgetting to remove the prime tower from the build plate before starting another print. It’s a little frustrating that the P1S can’t use its camera to detect failed prints, and it’s also annoying that you can’t exclude a specific model that’s failing on the build plate and continue to print the others as you can on the X1 Carbon. But these are all reasons why you might want to go the whole hog and just splash out on that printer instead.
Multi-colour printing is, of course, the other huge reason to choose a Bambu P1S. There are workarounds for doing this on other printers, but having an automatic system that changes colours without waiting for you to go and intervene is a huge benefit.

Jim Martin / Foundry
Because the old colour has to be purged from the nozzle before the new one emerges, colour changes can use up a fair amount of filament. And while you can arrange it so that there are minimal changes, that works only in certain circumstances, such as when colours change vertically in the model, as shown above.
If you wanted, say, the articulated axolotl shown below with each segment having alternating colours, then the filament would need to be changed at least once for every single layer of the print. That doesn’t just use up a lot of filament, it also adds a lot of time.

Jim Martin / Foundry
Bambu Studio allows you to specify how much filament should be “flushed” for changing from any colour to another, but will also automatically determine how much needs to be purged if you want to ensure no colour bleed. For example, in the model below, I deliberately lowered the flushing volume between red and white to show that you end up with pink for a while (look at the bottom) until the red is completely gone. The pattern visible here is simply because the white is only one layer thick.

Jim Martin / Foundry
There are also options to flush into the model’s infill, where the mixed colour won’t be seen. The default setting in Bambu Studio is also to print a ‘prime tower’ that helps with the colour changes, but even so, when filaments are swapped the P1S still ejects a coil of filament out of a chute at the rear. It’s strange there’s nothing to collect them: they simply end up on the desk behind the printer, or on the floor.

Jim Martin / Foundry
The point here is that printing with multiple colours when the printer has only one nozzle isn’t particularly fast or efficient. It does work well though, and it’s quite amazing to watch the AMS in action, loading and unloading different filaments as required.
There’s another benefit, too. Even if you don’t need a model to have multiple colours, the AMS means you can quickly and easily swap to a different colour for the next print automatically. Don’t underestimate how handy that is.
Bambu Studio & Handy app
You don’t have to use Bambu’s slicer or app, but you’d be slightly mad not to. Studio isn’t a Cura clone, so can take a little getting used to if you’ve only ever used Cura.
For first-time users, it’s great to have everything in one app: preparation, slicing and print monitoring. Studio has a variety of tools, including the ability to add supports manually, but also –and crucially – a painting tool that lets you add different colours to objects.

There are lots of great tutorials on Bambu’s wiki that teach you how to use the tools, which is good because they can be quite complex. Painting in particular isn’t as straightforward as you might expect, although if you select the correct options it’s possible to quickly fill certain areas without having to paint them manually with your mouse.

Jim Martin / Foundry
As Studio can sync colours from what’s loaded in the AMS, you don’t have to set those up manually either, and it’s as simple as right-clicking on an object and changing filament colour to one of those available.
One of the best things about Studio is that it will apply presets based on the filament you’re using. And although you don’t have to exclusively use Bambu filament, there are presets for all of them which means you don’t have to think about what bed and nozzle temperatures to use: they’re set automatically.
As I was about to publish this review, Bambu Lab launched www.makerworld.com, and integrated it into both Studio – the desktop software – and the Bambu Handy mobile app.
This fixed one of the drawbacks I would have mentioned otherwise: the inability to browse for something to print and send it to the printer all within the apps.
Both apps show the camera feed and print progress along with any problems or errors that might need your attention.

Jim Martin / Foundry
One oddity with the P1S is that when you print from either of the apps, it doesn’t store those models on the microSD card that must be inserted into the slot on top of the printer itself for remote printing to work. It is possible to print from a selection of pre-sliced models, but if you want to re-print anything you’ll have to look in the Print History in the apps.
Price & availability
The Bambu P1S costs $699 / £639, or $949 / £869 for the Combo version. You can buy a P1S directly from Bambu’s website.
If you already have the P1S or want more than four colours you can buy the AMS separately for $349 / £309. Just note that you also need the AMS Hub to connect more than one AMS to the P1S.
For alternative options, see our roundup of the best 3D printers.
Should I buy the Bambu P1S?
Bambu has an enviable reputation for excellent print quality, and P1S certainly lived up to the hype in my testing, besting every other printer I’ve reviewed.
However, even if you don’t go for the Combo, it is more expensive than some rivals. It’s $100 more than the Creality K1, and lacks the X1 Carbon’s touchscreen, which the K1 has.
While it does have a useful built-in camera for monitoring prints, it doesn’t have AI monitoring that could alert you to a failed print, rather than discovering only later that one object (or the entire print) hasn’t worked. Depending on where you keep the printer, these things may or may not be a problem.
Ultimately, it’s only the screen that really lets the P1S down, but as I said already, you can largely avoid it by using the desktop or mobile apps. And, finally, having made full use of the Creality K1 Max’s large build volume just before reviewing the P1S Combo, it is a shame that there’s no similar offering in Bambu’s range. So long as you won’t often need to print objects bigger than 256x256x256mm, though, the P1S really is a great choice and, even with that primitive screen, it’s easy to recommend.